This page will help you get started with the API - from preparing prerequisites in Event Portal through to retrieving Event API Product Details to creating API subscriptions
Purpose of the API
There is an ever increasing need to provide Event APIs to complement existing synchronous APIs - REST, GraphQL - to give apps more real-time access to data without the need for polling.
Typically API providers like to integrate Event APIs into existing Developer Portals so that developers can explore and gain access to Event APIs similarly to how they get access to other APIs.
The APIM/DevPortal API provides access to Solace Event Portal for integration with API Management platforms, API Marketplaces or Developer Portals. It provides a simplified interaction and object model aligned with Management APIs provided by API Management platforms.
Event APIs are documented using the Async API 2.x standard - a format that is increasingly supported by API-M vendors and open source developer portals such as backstage.io
API Concepts
The API provides two core concepts:
- Event API Products package one or more Event APIs and associate these with endpoints (Event Gateway broker). They also provide plans that configure policies such as event retention.
- Application Registrations represent a developer application. Once a developer requests access - i.e attempts to gain access to an Event API Product - an access request must be associated with the Application Registration.
The diagram below illustrates the object model and the core entities:
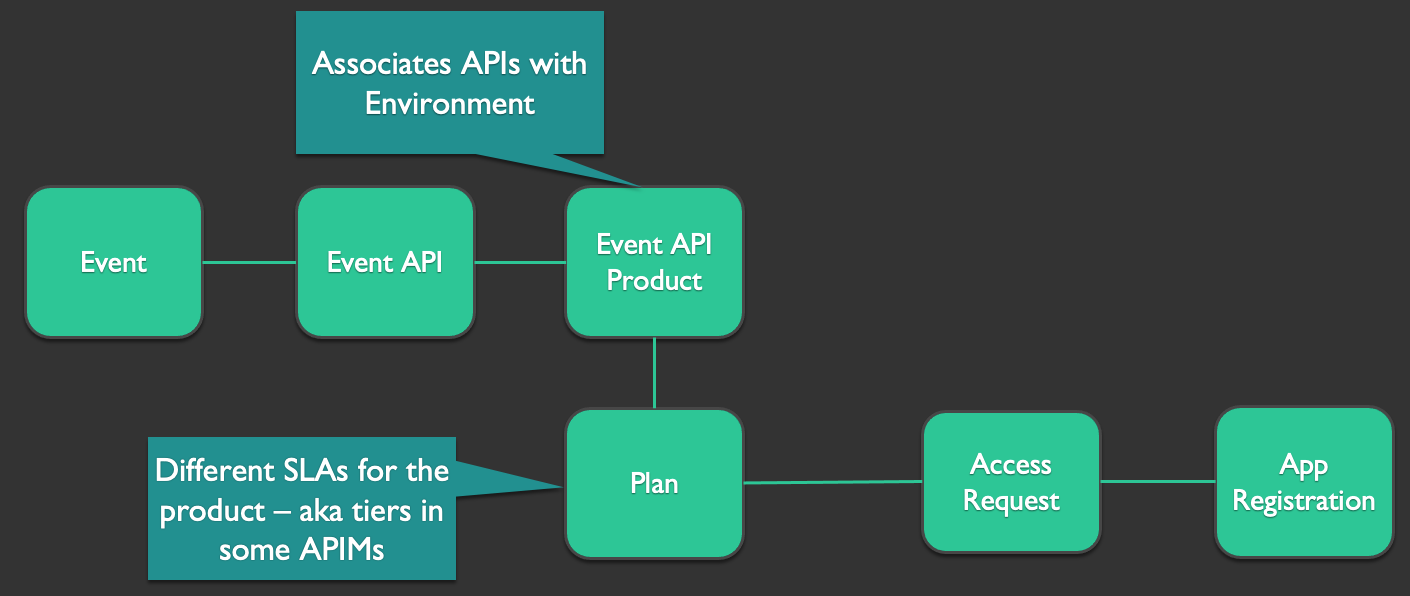
Event API Products are managed and maintained using Event Portal. Application registrations are created and managed by the API client - e.g. a developer portal or API Marketplace where a developer registers their API access requests.
Solace Event Portal Prerequisites
In order to make Event API Products available some prerequisite steps are required in Event Portal's Runtime Event Manager and Event Designer:
- Configure Solace PS+ brokers in the Runtime Manager for use in Event API Products
- Make Event API Products "publicly" available so they are visible in the API
Configure Solace PS+ brokers in the Runtime Manager
This section highlights the relevant actions required for the API. For more details please see the Runtime Event Manager product documentation.
We need to make sure there is a suitable broker set up in a Modelled Event Mesh so we can associate Event API Products with an environment and broker:
- Create a new or use an existing Modelled Event Mesh (MEM)
- Navigate into the MEM and select the "Event Broker Connections" tab
- If there are no event brokers listed or the intended broker is missing use "Connect an Event Broker".
- Verify the broker configuration is correct
Create a new or use an existing Modelled Event Mesh (MEM)
Please see product documentation for details
Navigate into the MEM and select the "Event Broker Connections" tab

Connect an Event Broker
If there are no event brokers listed or the intended broker is missing see Adding an Event Broker to a Modeled Event Mesh.
Verify the broker configuration
Complete information must be provided for each broker that you intend to use with Event API Products - on the "Management" and "Messaging" tab.
To review the broker configuration see Managing Model Event Brokers
The "Management" tab must be completely filled in.

On the "Messaging" tab make sure to set the Host Name and add all the protocols that you wish to expose in Event API Products.

Make Event API Products "publicly" available
Only publicly available Event API Products are visible in the API. The following conditions must apply (see also the screenshot below):
- Event API Product must be "shared".
- The version must be in RELEASED state.
- An environment and broker must be associated with the version.
- At least one plan must be defined.
- The version must be marked as "Publicly available"

Interacting with the API
Then you can interact with the API:
- API Authentication
- Obtaining available Event API Products
- Continue a simple end to end walkthrough
- Filtering Event API Products
- Filter Event API Products on Custom Attributes
API Authentication
In order to call the API you need an API Token that you can obtain using the Solace Cloud console or by sending requests to sequence of REST APIs.
Create an API Token in the Solace Cloud Console
The creation and management of API tokens is documented at Managing API Tokens.
You need to grant the following permissions to the token (listed in the order found on the token creation page):
mission_control:accessAllow access to mission control (in permission setMission Control > My Service)service_requests:post:client_profileCreate / Update / Delete Client Profiles (in permission setMission Control > Organization Services)services:getGet Services with Management Credentials (in permission setMission Control > Organization Services)services:putUpdate Service (in permission setMission Control > Organization Services)messaging_service:readRead any Messaging Service (in permission setEvent Portal 2.0 > Runtime Event Manager)modeled_event_mesh:get:\*Read any Modeled Event Mesh (in permission setEvent Portal 2.0 > Runtime Event Manager)apim_event_api_product:*:*Create, update, or delete published event API products and their underlying resources. (in permission setEvent Portal 2.0 > API Management / DevPortal)application_domain:get:\*Read any Application Domain (in permission setEvent Portal)event_designer:accessAccess to Event Portal Designer (in permission setEvent Portal)
Create an API Token using REST APIs
Alternatively, you can create an API Token by using Solace Cloud APIs following these steps:
- Create a user token - required to generate an API token
- Create a Solace Cloud account (organization) specific user token (only relevant if the user is associated with multiple Solace Cloud accounts/organizations)
- Obtain an API token with the required permissions
Create a User Token
The user token is required for authentication and authorisation when generating an API token.
Replace solace_cloud_username and solace_cloud_password with credentials of a Solace Cloud user who is either Administrator or has Mission Control Editor and Event Portal Manager user roles. The response contains the token that is referred to as user_token in the next section and can be used as org_user_token in the subsequent steps if the user is only associated with one account.
curl --location --request POST 'https://api.solace.cloud/api/v1/iam/tokens' \
--header 'Content-Type: application/json' \
--data-raw '{
    "username" : "{solace_cloud_username}",
    "password" : "{solace_cloud_password}"
}'
{
    "token": "eyJhbGciOiJSUzI1NiIsImtpZCI6Im1hYXNfcHJvZF8yMDIwMDMyNiIsInR5cCI6IkpXVCJ9.xyzabcOiIzZTJvY214MTA1Iiwib3JnIjoiYm9zY2hiYm1wb2MiLCJvcmdUeXBlIjoiRU5URVJQUklTRSIsIm9yZ05hbWUiOiJCb3NjaCBCQk0gUE9DIiwicGVybWlzc2lvbnMiOiJBQUFBQUFDZ0FBQUFBQUFBQUFBQUFBQUFBQUFBQUFBQUFBQkEiLCJpc3MiOiJTb2xhY2UgQ29ycG9yYXRpb24iLCJpYXQiOjE3MDA1ODYwNjYsImp0aSI6IjVrYnNvZThzN3U3IiwiZXhwIjoxNzAwNjcyNDY2fQ.Fv8lFfH8ChmDA6ShAn7VWYrZCPBBmPCunWygfgmsRnCR1mcR_ZkESRXh2U638A7ylfxKtZPNbwJRkPIw0zbSBCfgPK_CnefGarEPH_K7GbqyhkUnOY0-Ug1NyAS0PXTjrZ3Tz7fiDhmLk84ODHFj7W4TIM8KyvMlbm0nYAuPaJOGtojAuEtrWSYhpB1pFwa-bjoArvSUv_dY3m5TOZztKmzKxm0IX5XsXOSlrwvu-M8z5TExH1g1-6jam48-AaEPyLca1WeW4tiGtQarS6yPD5b0pGT-uYI8nqzCIZ_It6wb61TKfisxtSjaWKt-WXu6W6FggrVtTh9pAAuyV54321"
}
If the user account is associated with multiple Solace Cloud accounts it needs to be exchanged for a user token for the required account/organization.
Exchange User Token for a specific Solace Cloud Account Token
The user token is tied to a specific account. If the user is associated with multiple accounts you need to create a user token for the desired account. Otherwise you can skip this step.
Replace user_token in the request with the response to the request in the previous section and also replace `{account_name} with the specific Solace Cloud account name.
The response contains the token that is referred to as org_user_token in the next section.
curl --location --request POST 'https://api.solace.cloud/api/v0/iam/tokens/{account_name}' \
--header 'Authorization: Bearer {user_token}' \
--data ''
{
    "token": "eyJhbGciOiJSUzI1NiIsImtpZCI6Im1hYXNfcHJvZF8yMDIwMDMyNiIsInR5cCI6IkpXVCJ9.xyzabcOiIzZTJvY214MTA1Iiwib3JnIjoiYm9zY2hiYm1wb2MiLCJvcmdUeXBlIjoiRU5URVJQUklTRSIsIm9yZ05hbWUiOiJCb3NjaCBCQk0gUE9DIiwicGVybWlzc2lvbnMiOiJBQUFBQUFDZ0FBQUFBQUFBQUFBQUFBQUFBQUFBQUFBQUFBQkEiLCJpc3MiOiJTb2xhY2UgQ29ycG9yYXRpb24iLCJpYXQiOjE3MDA1ODYwNjYsImp0aSI6IjVrYnNvZThzN3U3IiwiZXhwIjoxNzAwNjcyNDY2fQ.Fv8lFfH8ChmDA6ShAn7VWYrZCPBBmPCunWygfgmsRnCR1mcR_ZkESRXh2U638A7ylfxKtZPNbwJRkPIw0zbSBCfgPK_CnefGarEPH_K7GbqyhkUnOY0-Ug1NyAS0PXTjrZ3Tz7fiDhmLk84ODHFj7W4TIM8KyvMlbm0nYAuPaJOGtojAuEtrWSYhpB1pFwa-bjoArvSUv_dY3m5TOZztKmzKxm0IX5XsXOSlrwvu-M8z5TExH1g1-6jam48-AaEPyLca1WeW4tiGtQarS6yPD5b0pGT-uYI8nqzCIZ_It6wb61TKfisxtSjaWKt-WXu6W6FggrVtTh9pAAuyV54321"
}
You can find a Solace Account Name in the Solace Cloud Console - https://console.solace.cloud/account-details/overview

You can view a list of accounts a user is associated with and switch between accounts in the Solace Cloud Console - https://docs.solace.com/Cloud/cloud-login-urls.htm#:~:text=Switching%20Between%20Accounts
Create a API Token
- Replace
{org_user_token}with the token (JWT) you received when generating the user token or the response to the previous' sections request to obtain an account specific user token. - All of the permissions in this sample request below are required.
Note:apim_event_api_product:*can currently not be granted in the Solace Cloud console. - Replace
{api_token_name}with the name you want to use to identify your token in the Solace Cloud console. - The response includes the token id and the token (JWT). Keep your token safe so you can use it for your API calls. You may also want to hang on to the id in case you want to delete or regenerate the API token subsequently.
curl 'https://api.solace.cloud/api/v0/user/apiTokens' \
  -H 'authority: api.solace.cloud' \
  -H 'accept: application/json, text/plain, */*' \
  -H 'authorization: Bearer {org_user_token}' \
  -H 'content-type: application/json' \
  --data-raw '{  "name": "{api_token_name}",  "permissions": [ "service_requests:post:client_profile", "event_designer:access", "apim_event_api_product:*:*", "application_domain:get:*", "modeled_event_mesh:get:*", "messaging_service:read", "services:get", "application_domain:get:*", "mission_control:access", "services:post" ]}' \
  --compressed
{
  "data" : {
    "id" : "y1243zg8tvi",
    "name" : "recipe-token",
    "token" : "eyJhbGciOiJSUzI1NiIsImtpZCI6Im1hYXNfcHJvZF8yMDIwMDMyNiIsInR5cCI6IkpXVCJ9.eyJvcmciOiJzb2xhY2xt4b3R0ZWFtIi6473JnVHlwZSI6IkVOVEVSUFJJU0UiLCJzdWIiOiIzZTJvY214MTA1IiwicGVybWlzc2lvbnMiOiJBQUFBQUFBQUFBQUFBUkFBQUFBQUFBQUFBQUFBQUFBQUFBQUFBQUFBQUFBQUlBQUFnQUFBQUFBQUFBSUFBQUFDQUFJPSIsImFwaVRva2VuSWQiOiJ5MTI0M3pnOHR2aSIsImlzcyI6IlNvbGFjZSBDb3Jwb3JhdGlvbiIsImlhdCI6MTY5NjM0Nzk3Nn0.mrRsj0HLpycYmY6PPQZkUSBo5vJgh8eYof0M9Jii84kRg4AISb91O5AwhY5X_hhp2vAtWLPk_WIWCRwtiOXw37EjeF8hEczmlItHm3hU-7cr80ufsEZaXAx4vHX5X8cefJjnQ1zW_XN65xzEWUgnbdOMRXewzXrjItPH8RlDQkq4EO3invKFRyEI6-pj--BD80RoLXp7Do5Xe-I61-DaRnSKrrY9rFhnLTpbZtLXUCCO4i-RakfkPKaml5TxN7tELkDMBoJ3q6LQZ4th5Wc7w-yAxCkiPj-vboJNLhe7yGay_cAdQuFyGzKgCfr4oHeJ4Sii5jYHMnhZgceutamSlQ",
    "creationTimestamp" : 1696347976026,
    "permissions" : [ "service_requests:post:client_profile", "event_designer:access", "apim_event_api_product:*:*", "application_domain:get:*", "modeled_event_mesh:get:*", "messaging_service:read", "services:get" ],
    "orgId" : "solaceiotteam",
    "type" : "apiToken"
  }
}
Get Event API Products
Let's look at a first API call and explore the main elements of an Event API Product.
- You most provide a valid Solace Cloud API Token in the HTTP Authorization header (see above)
- This call returns a list of Event API Products that are publicly available in the Event Portal account associated with the provided API token.
The id property of the object can be used to retrieve a detail view as well as calling sub resources of Event API Products such as plans or attributes. - Plans are embedded in the Event API Products response. These represent the SLAs or tiers offered for subscriptions created by developers.
- The apis array contains the Event APIs that are part of the Event API Product.
curl --request GET \
     --url https://apim-devportal-api.solace-labs.io/api/v2/apim/eventApiProducts \
     --header 'accept: application/json' \
     --header 'authorization: Bearer <<user>>'
{
    "data": [
        {
            "plans": [
                {
                    "id": "8a0g3o0prdf",
                    "name": "silver",
                    "solaceClassOfServicePolicy": {
                        "id": "x1c1zh539xg",
                        "messageDeliveryMode": "guaranteed",
                        "accessType": "exclusive",
                        "maximumTimeToLive": 1,
                        "queueType": "single",
                        "maxMsgSpoolUsage": 1
                    }
                },
                {
                    "id": "lsw67j8cy26",
                    "name": "bronze",
                    "solaceClassOfServicePolicy": {
                        "id": "t9vhjuizng4",
                        "messageDeliveryMode": "guaranteed",
                        "accessType": "exclusive",
                        "maximumTimeToLive": 1,
                        "queueType": "single",
                        "maxMsgSpoolUsage": 1
                    }
                }
            ],
            "apis": [
                {
                    "id": "29591g18w8q",
                    "version": "1.0.0",
                    "description": "BUS1006",
                    "displayName": "BUS1006",
                    "name": "BUS1006",
                    "customAttributes": []
                }
            ],
            "apiParameters": [
                {
                    "name": "REFERENCE",
                    "dataType": "string",
                    "parameterType": "unbounded"
                }
            ]
            "createdTime": 1693576372483,
            "updatedTime": 1693576420187,
            "createdBy": "3e2ocmx105",
            "changedBy": "3e2ocmx105",
            "id": "kils37cwlkz",
            "name": "Asapio BUS1006",
            "applicationDomainId": "bpgli1jzier",
            "applicationDomainName": "asapio/consumers",
            "approvalType": "automatic",
            "brokerType": "solace",
            "description": "BUS1006 - new version",
            "version": "1.7.0",
            "displayName": "1.7.0-BUS1006",
            "state": "RELEASED",
            "solaceMessagingServices": [
                {
                    "solaceCloudMessagingServiceId": "dr6uq5q8gjj",
                    "id": "f5ug1291p2g",
                    "messagingServiceId": "wgex5k3ov3h",
                    "messagingServiceName": "APIM-GW-DEV",
                    "supportedProtocols": [
                        "smfc",
                        "smf",
                        "smfs",
                        "amqp",
                        "amqps",
                        "mqtt",
                        "secure-mqtt",
                        "mqttws",
                        "secure-mqttws",
                        "http",
                        "https"
                    ],
                    "environmentName": "asapio",
                    "eventMeshName": "asapio"
                }
            ],
            "customAttributes": [
                {
                    "name": "PUBLISH_DESTINATIONS",
                    "value": "ep-developer-portal"
                }
            ],
            "attributes": [],
        }
    ],
    "meta": {
        "pagination": {
            "pageNumber": 1,
            "nextPage": null,
            "totalPages": 1,
            "count": 1,
            "pageSize": 20
        }
    }
}
Looking to download the OpenAPI Specification?
You can download the OpenAPI v3 specification to generate client code or for use in other tooling.